Using AS/NZS 1554.6 effectively means rather more than requiring “Weld finishing to AS/NZS 1554.6”. The standard is an effective way to get the finish you want or need on stainless steel structures. This guide should help you to nominate the quality of weld to the standard.
What is this standard?
This standard is for welding any non-pressure stainless steel equipment and when it was first drafted in 1994, its structure followed that of Part 1 dealing with carbon steel. A major revision in 2012 removed redundant text, expanded the good workmanship guidelines and brought the weld assessment and finishing processing up-to-date, while including guidance on precautions to minimise risk of failure from vibration. The assessment section includes mandatory limits to weld defects and now includes optional features such as level of heat tint and surface roughness that may be specified by the principal or owner.
AS/NZS 1554.6 is a mixture of mandatory requirements and recommendations with shopping lists of possibilities. In particular, the post-weld treatment provides a number of possible processes and results, and specifying the option desired will minimise cost and frustration and deliver the result required. As an example of mandatory requirements, there are strict requirements for personnel qualifications, which are difficult to address retrospectively.
The raw product of welded fabrication
Figure 1 (refer to banner image above) is typical of a routine TIG butt weld of two thin 316 stainless steel sheets and displays a rainbow of colours on the surface. The colours are caused by optical interference of reflections from the front and back of the heat formed oxide layer - just like reflections in an oil film on water. The unprotective iron-rich oxide layer can be seen in the dark colours and can reduce the corrosion resistance of a 316 to below that of a 12% chromium stainless steel. They must be removed along with a small amount of steel underneath them, where the chromium has been depleted during welding. Specifying their removal is covered later in this article. Let’s start with Section 6, because that is where the weld quality is assessed.
Classification of welds
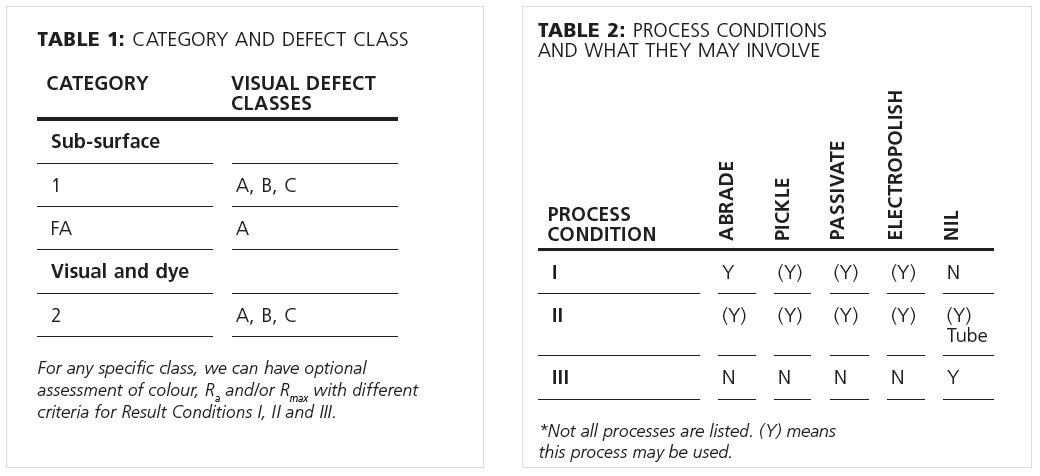
Welds are classified as Category 1 (structural) or Category 2 (non-structural). Category 1 welds have a subset Fatigue Applications (FA), where vibration and fatigue failures may be an issue. The main difference is that Category 1 and Category FA welds require external visual inspection plus sub-surface inspection by radiography or ultrasonics. The permitted levels of sub-surface defects are listed in Tables 6.3.2(A) and 6.3.2(B) for structural and fatigue classifications respectively.
However, all of the Categories 1, 2 and FA are assessed against three levels of surface defects revealed by visual and liquid penetrant inspection.
The permitted defect sizes are set out in Table 6.3.2 and are grouped under three levels:
A: No defects and used for critical structural, aesthetic or corrosive service;
B: High quality for general and non-critical aesthetic uses but may have minor defects that allow corrosives to accumulate in very aggressive environments;
C: Hidden locations or areas with low stress and benign conditions.
The temptation is to specify Level A for everything, but this may raise costs unnecessarily without adding to durability. Often Level B is very satisfactory. For instance, the ASSDA tea staining requirement of weld quality is Category 2, Level B.
Category FA welds require compliance to Level A assessment of surface defects plus restrictions on the angle between fillet weld tangents and the adjoining stainless steel surface. This restriction supplements the 1 in 4 slope in section thickness changes set out elsewhere in the standard. Table 6.3.1(B) gives the level of sub-surface defects permitted. It applies only for FA requirements.
Post-weld surface finishing
The standard also provides options for post-weld and surface finishing. Welds may be treated mechanically with abrasives, or chemically (or electrochemically). Any of these finishes can be called up for Condition I and Condition II, but the defining feature of Condition I is that the weld bead must be ground flush. This strip polishing is common in tank fabrication for the food and beverage industries. It removes the heat tint and the chrome depleted layer beneath it without using pickling acids, but it also improves cleanability by removing the weld bead with its inherent unevenness. In vibrating applications, the mechanical removal also decreases the risk of stress concentration along the stiffening line of a weld bead.
The standard also allows stainless steel brushing to remove surface deposits or else for the surface to be left “as welded”. These options are included in Condition III.
Table 6.2.1 summarises the paths to the surface conditions and Table 6.3.3 provides the acceptance criteria based on discolouration, average surface roughness Ra and maximum surface roughness (Rmax). In the 2012 version, the criteria are largely “specified by the principal”, but Condition I and II for discolouration are tied to the AWS D18.2 colour charts of heat tint which match Sandvik and Nickel Institute work confirming that a pale straw colour caused no detectable change in corrosion resistance. There are non-mandatory notes that transverse surface roughness should be <0.5μm Ra and clean cut for corrosive service [as for surface 2K in EN 10088.2] and about the applicability of Rmax to cleanability in hygienic service. Amongst other variables, the grit size will determine the roughness (Ra and Rmax) and hence the as-abraded corrosion resistance and cleanability.
Condition III does not have acceptance criteria.
Tables 1 and 2 below are a guide to the use of category, class and condition (used both for treatments applied and assessment results) and relate them to post-weld processes.

Other treatments
While mechanical abrasion will remove heat tint and the chrome depleted layer, it will expose manganese sulphide inclusions which are points for corrosion initiation. It may also leave metal flakes on the surface, which provide crevice corrosion sites.
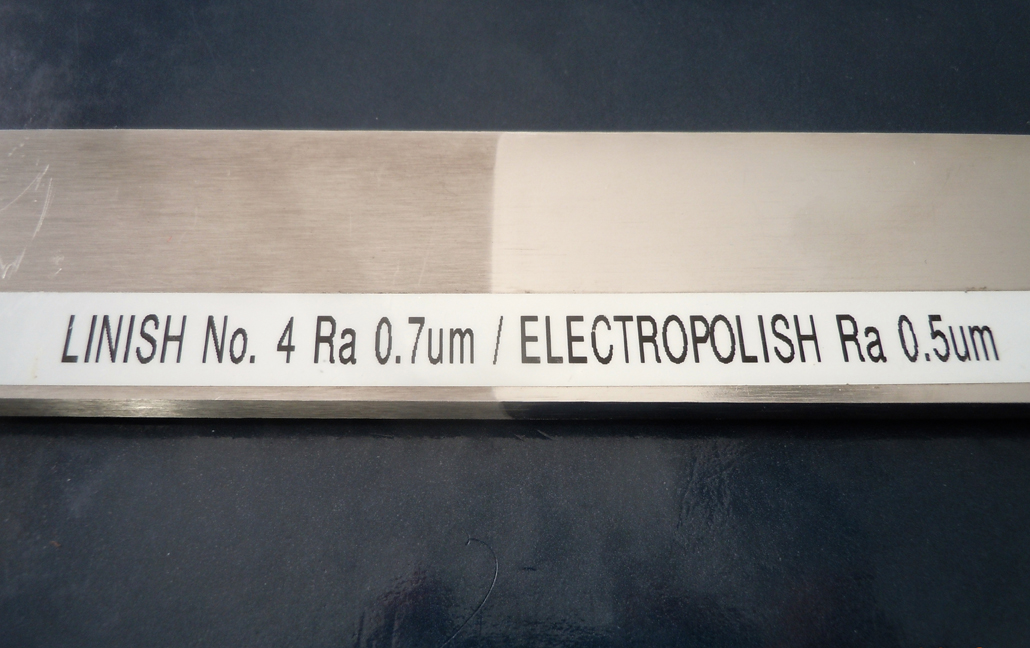
Pickling [Section 6.2.3(a)] using a nitric/hydrofluoric acid bath or paste will remove metal flakes and manganese sulphide inclusions. Pickling a non-abraded weld area will not significantly change the surface roughness, but will give similar corrosion resistance to an abraded and pickled surface. If the use of hydrofluoric acid is difficult, then a nitric acid passivation process of an abraded surface will improve the passive film, remove the inclusions, but not any metal flakes. A passivation treatment will strengthen the passive film even of a pickled surface. A nitric-only treatment is not effective on a heat tinted surface. Other modifications of Conditions I and II include electropolishing [6.2.3(b)] or, more recently, electrocleaning [6.2.3(c)]. Both apply a current which dissolves the surface either in a bath (electropolishing) or on site (electrocleaning). The mechanically polished bar illustrated in Figure 2 had an Ra of ~0.7μm before electrolishing, but 0.2μm less  afterwards and with a much brighter appearance that also has a thicker passive film. Electrocleaning is a manual process, and while it can produce a very strong passive film, its results depend on the expertise of the operator.
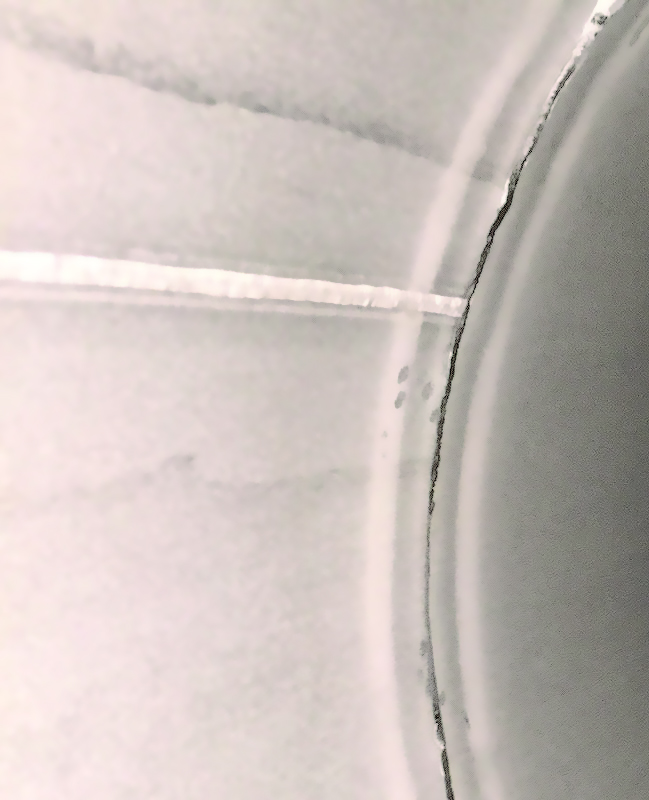
Condition II finishes include simple pickling (HF/HNO3), electropolishing (although often with a prior pickle to remove non-conductive weld scales) and electrocleaning for site operations. The longitudinal weld in the pipe (refer to Figure 3 below) still has weld reinforcement, but is chemically clean. The black lines parallel to the weld have not been affected by the acid pickling and are probably due to cracked oils not removed by solvents prior to welding. Post-pickling passivation is also included in this Condition II suite of treatments.
The mechanical treatment of heat tint by stainless steel brushing [6.2.3(d)] simply burnishes the surface and does not remove the low chromium layer beneath, i.e. it will not restore the corrosion resistance. Abrasive polishing, linishing, grinding [6.2.3(e)] or even blasting [6.2.3(f)] can remove heat tint and the low chromium layer while leaving some weld reinforcement, but a nitric acid passivation process may be required afterwards. In addition, the surface may be too rough for good cleanability or smooth appearance. Under Condition II, one treatment to provide oxide-free welds for pipes and tubes is the use of inert gas purging with low (tens of ppm) oxygen levels.
 Apart from the weld inspection, Section 5 of the standard has multiple recommendations for excellent fabrication including heat input, interpass temperatures, avoidance of arc strikes and welding under adverse weather conditions, to name a few. There are also mandatory requirements (the “shall” clauses) on tack weld size, weld depth to width ratio, thinning of metal when dressing welds and even chloride limits in leak test water. The standard is detailed and requires some study for those wishing to produce good welds compliant to the relevant sections of AS/NZS 1554.6 and applicable to the application or structure under consideration.
Conclusion
The specification of weld quality requires an understanding of mechanical and chemical processes used to produce a smooth and clean surface suitable for the specific application. The standard provides a shopping list to accurately specify exactly what you want. Respecting that intent will lead to the greatest productivity in delivering the structure.
This article is featured in Australian Stainless Magazine issue 58 (Summer 2016/17).